
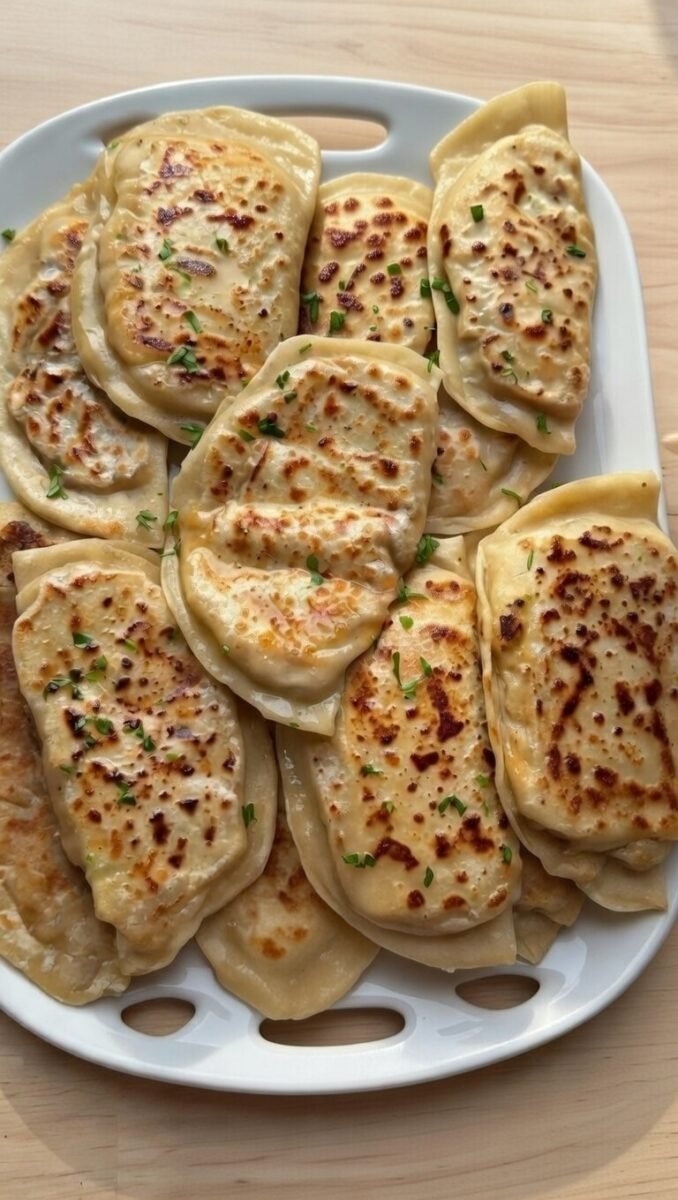
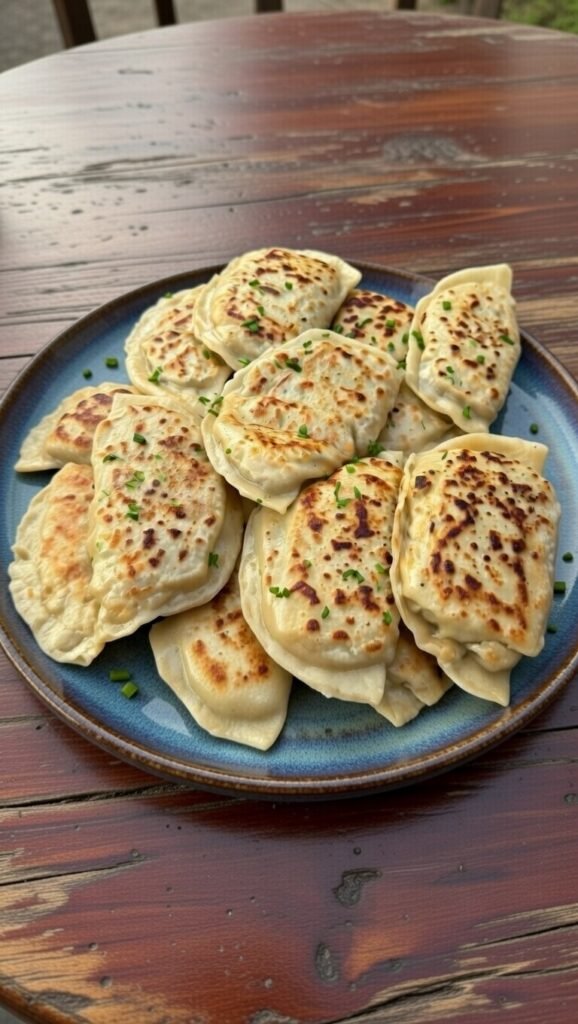
Golden, crisp on the outside and creamy, savory on the inside, these Cheesy Tuna Melt hand pies are the perfect fusion of comfort food and convenience. Made with soft homemade dough and a flavorful tuna filling packed with vegetables, herbs, and melted cheese, they are ideal for lunchboxes, casual dinners, or satisfying snacks.
This recipe combines a lightly sweetened olive oil dough with a creamy tuna mixture enriched with pickles, onion, bell pepper, corn, mayonnaise, and grated cheese. Cooked in a skillet until golden brown, these handheld melts deliver a crisp crust and gooey center without needing an oven.
Below you will find a complete guide to preparing these delicious tuna melts, along with tips, variations, and storage advice to ensure perfect results every time.
Why You’ll Love These Cheesy Tuna Melts
These tuna hand pies stand out because they are:
- Crispy and golden on the outside
- Creamy and cheesy on the inside
- Packed with flavor and texture
- Easy to cook in a pan
- Perfect for meal prep or entertaining
Unlike traditional open-faced tuna melts, this version seals the filling inside soft dough, creating a portable and mess-free meal.
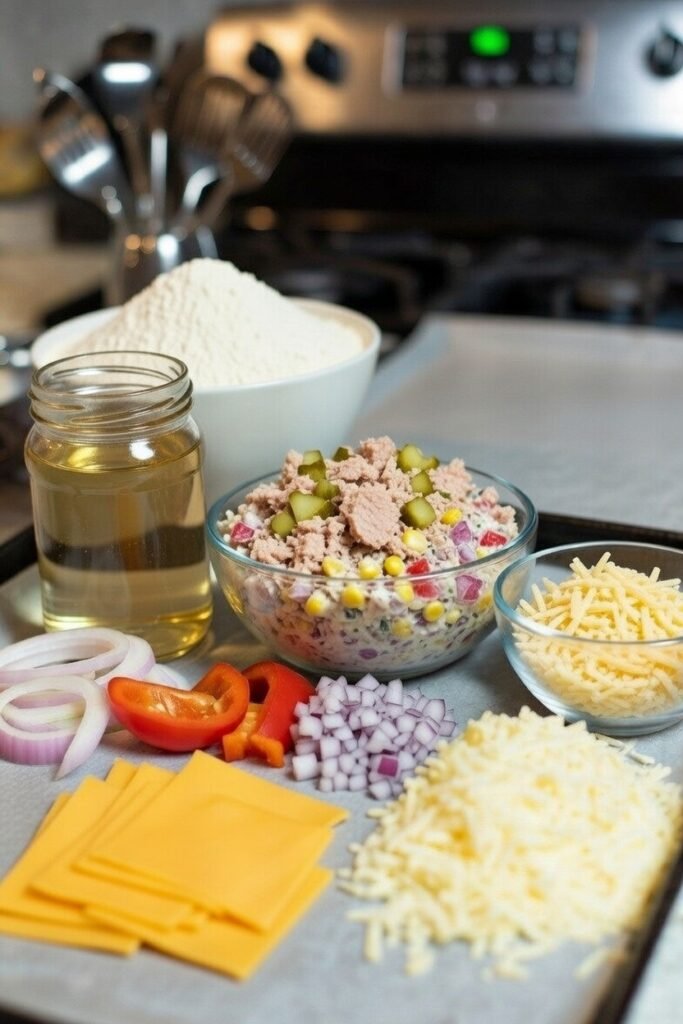
Ingredients Overview
Dough
- 250 g all-purpose flour
- 4 g salt (⅔ teaspoon)
- 8 g honey
- 135 ml water
- 15 ml olive oil
The honey adds subtle balance to the savory filling, while olive oil keeps the dough tender and pliable.
Tuna Mixture
- 50 g pickles, finely chopped
- 100 g red onion, finely chopped
- 40 g red bell pepper, small dice
- 35 g corn
- 140 g tuna (in sunflower oil, drained)
- 1 g cayenne pepper (⅓ teaspoon)
- 0.5 g Italian seasoning (⅓ teaspoon)
- 100 g mayonnaise
- 150 g grated cheese
Optional for Serving
- Cheddar cheese slices
Adding a slice of cheddar inside before sealing creates an extra creamy, molten center.
Step-by-Step Instructions
Step 1: Prepare the Dough
In a large bowl, combine the flour, salt, honey, olive oil, and water. Mix until a rough dough forms.
Transfer the dough to a clean surface and knead for 10 to 12 minutes. The dough should become smooth, elastic, and cohesive. Proper kneading develops gluten, which gives the dough structure and makes it easier to roll.
Cover the dough with a towel or plastic wrap and let it rest for 10 minutes. This short rest relaxes the gluten, making the dough easier to shape.
Step 2: Prepare the Tuna Filling
In a mixing bowl, combine:
- Finely chopped pickles
- Red onion
- Red bell pepper
- Corn
- Well-drained tuna
Mix thoroughly to distribute the vegetables evenly.
Add cayenne pepper and Italian seasoning. Stir to combine.
Fold in the mayonnaise and grated cheese. Mix until fully incorporated and creamy. The filling should be thick, moist, and well-bound without being runny.
Set aside while you portion the dough.
Step 3: Divide and Shape the Dough
Divide the rested dough into 13 equal pieces, approximately 30 grams each. Roll each piece into a smooth ball.
On a lightly floured surface, roll one dough ball into a round disc, about 12–14 cm in diameter. Keep the thickness even to ensure uniform cooking.
Step 4: Fill and Seal
Spoon approximately 50 grams of tuna mixture onto one half of the dough circle, leaving a small border around the edges.
If desired, add a slice of cheddar cheese on top of the filling for extra creaminess.
Lightly moisten the edges of the dough with water. Fold the dough over the filling to create a half-moon shape.
Press the edges firmly to seal. You can use a fork to crimp the edges for a decorative finish and stronger seal.
Repeat with the remaining dough and filling.
Place the filled pieces on parchment paper while you prepare to cook.
Step 5: Cook the Tuna Melts
Heat a heavy-bottomed frying pan over medium-high heat and add a small amount of oil.
Place several tuna melts in the pan without overcrowding. Cook for about 3–4 minutes on each side, or until golden brown and crisp.
Adjust heat as needed to avoid burning. The dough should cook through completely while achieving a rich golden color.
Transfer to a plate lined with paper towels if needed.
Serve warm while the cheese is melted and the filling is creamy.
Tips for Perfect Results
Drain the Tuna Thoroughly
Excess moisture can make the filling too wet and difficult to seal.
Seal Carefully
Press edges firmly to prevent filling from leaking during cooking.
Control the Heat
Medium to medium-high heat ensures the dough cooks through without burning.
Roll Evenly
Even thickness prevents undercooked centers or overly crisp edges.
Flavor Variations
These tuna melts are highly adaptable. Try these creative variations:
Spicy Version
Add chopped jalapeños or increase cayenne for extra heat.
Mediterranean Style
Incorporate olives, capers, and a squeeze of lemon juice.
Herb-Forward
Add fresh parsley or dill for brightness.
Different Cheeses
Try mozzarella for stretch, gouda for smokiness, or provolone for richness.
Serving Suggestions
Serve Cheesy Tuna Melts with:
- Fresh green salad
- Tomato soup
- Yogurt-based dipping sauce
- Garlic aioli
- Pickle spears
They are excellent for lunch, dinner, or party appetizers.
Storage and Reheating
Store cooled tuna melts in an airtight container in the refrigerator for up to three days.
Reheat in a skillet over medium heat to restore crispness. Avoid microwaving if possible, as it may soften the crust.
You can also freeze uncooked filled dough pieces. Cook directly from frozen over medium heat, adding a few extra minutes per side.
Nutritional Perspective
These tuna melts provide:
- Protein from tuna and cheese
- Healthy fats from olive oil and tuna
- Fiber and nutrients from vegetables
Portion size and cheese quantity can be adjusted to fit dietary needs.
Frequently Asked Questions
Can I bake these instead of pan-frying?
Yes. Bake at 190°C (375°F) for about 18–22 minutes until golden brown.
Can I use canned tuna in water?
Yes. Drain very well and consider adding a little extra mayonnaise for moisture.
Why is my dough tough?
Overworking or insufficient resting time can cause toughness. Allow proper rest after kneading.
Can I prepare the filling in advance?
Yes. The filling can be refrigerated for up to 24 hours before assembling.
What type of cheese works best?
Cheddar melts well and adds sharp flavor, but any good melting cheese can be used.
Conclusion
Cheesy Tuna Melt Hand Pies offer the perfect balance of crisp exterior and creamy, savory filling. With tender homemade dough and a flavorful tuna mixture packed with vegetables and cheese, this dish transforms simple pantry ingredients into something comforting and satisfying.
Whether served fresh from the skillet or reheated for a quick meal, these tuna melts are versatile, flavorful, and sure to become a repeat favorite in your kitchen.