
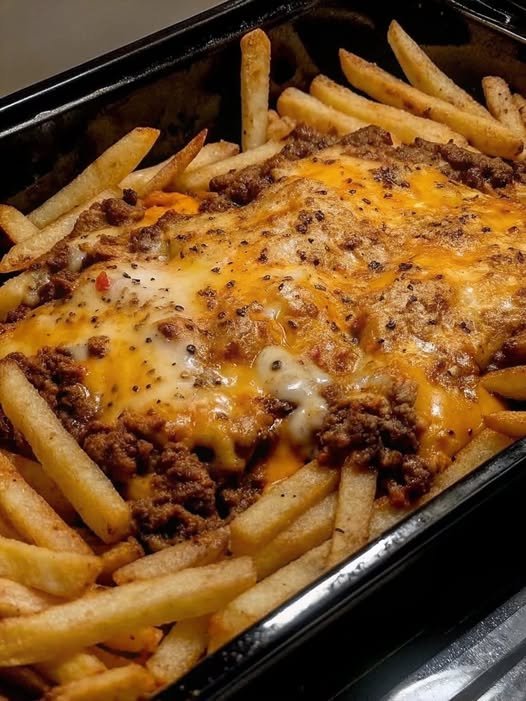
These Cheesy Chili Fries are a simple, craveable one-dish meal that combines oven-crisp fries with a savory ground-beef chili and gooey melted cheddar. They’re perfect for weeknight dinners, game-day spreads, or when you want comfort food without a lot of fuss.
Using the oven to bake both fries and cheese-topped chili keeps cleanup simple and yields reliably crisp fries under a blanket of cheesy chili. Follow this tested recipe to make crowd-pleasing Cheesy Chili Fries at home with minimal effort.
Why You’ll Love This Recipe
- Fast and satisfying: Ready in about 45 minutes from start to finish.
- Minimal hands-on time: Oven does most of the work; the chili simmers while fries bake.
- Customizable: Easy to scale, spice up, or make vegetarian with simple swaps.
- Family- and party-friendly: Great as a main dish or shareable appetizer.
- Crispy fries + saucy chili + melted cheese = irresistible texture contrast.
Ingredients
Use the exact ingredient names below for accurate results. This recipe serves about 4 as a main course or 6 as a shareable snack.
- 1 lb (450 g) frozen French fries (or fresh fries)
- 1 lb (450 g) ground beef
- 1 small yellow onion, finely chopped (about 1 cup)
- 2 cloves garlic, minced
- 2 tbsp tomato paste
- 1/2 cup diced tomatoes (canned or fresh) or 1/3 cup tomato sauce
- 1/4–1/2 cup beef broth or water (start with 1/4 cup)
- 1 tbsp Worcestershire sauce
- 1 tbsp chili powder
- 1 tsp ground cumin
- 1/2 tsp smoked paprika (optional)
- 1 tsp granulated sugar (optional, to balance acidity)
- 1 tsp kosher salt (adjust to taste)
- 1/2 tsp black pepper, plus extra for finishing
- 1 tbsp neutral oil (if frying or for the pan)
- 1 1/2 cups shredded sharp cheddar
- 1/2 cup shredded mozzarella (optional, for stretch)
- Optional toppings: chopped scallions, sour cream, pickled jalapeños, hot sauce
Kitchen Tools Needed
- Baking sheet or ovenproof dish (9×13 works well)
- Large skillet (10–12 inch) — ovenproof if you want to assemble in the pan
- Spatula or wooden spoon
- Measuring cups and spoons
- Chef’s knife and cutting board
- Optional: wire rack for extra-crispy fries
Step-by-Step Instructions
Follow these step-by-step actions. Each step contains a single clear action for easy execution and voice-search friendliness.
- Preheat your oven to 425°F (220°C).
- Arrange frozen fries in a single layer on a baking sheet or in an ovenproof dish.
- Bake the fries according to package directions until golden and crisp (usually 20–25 minutes), turning once halfway through.
- If using fresh fries, toss them with 1 tablespoon neutral oil and a pinch of salt.
- Roast fresh fries on a baking sheet at 425°F until crisp, about 25–30 minutes, turning once.
- While fries bake, heat a large skillet over medium-high heat.
- Add 1 tablespoon of neutral oil to the skillet and swirl to coat.
- Add the chopped onion to the skillet and sauté for 3–4 minutes until translucent.
- Add the minced garlic and cook for 30 seconds until fragrant.
- Add the ground beef to the skillet and break it up with a spatula.
- Cook the beef until browned with no pink remaining, about 6–8 minutes.
- If there is excess fat, carefully drain or spoon it out, leaving just enough to coat the pan.
- Stir in 2 tablespoons tomato paste and cook for 1 minute to deepen flavor.
- Add 1/2 cup diced tomatoes (or 1/3 cup tomato sauce) to the skillet.
- Pour in 1/4 cup beef broth (add up to 1/2 cup if mixture looks dry).
- Add 1 tablespoon Worcestershire sauce, 1 tablespoon chili powder, 1 teaspoon ground cumin, and 1/2 teaspoon smoked paprika if using.
- Add 1 teaspoon granulated sugar (optional), 1 teaspoon kosher salt, and 1/2 teaspoon black pepper.
- Bring the chili mixture to a simmer over medium heat.
- Reduce heat to medium-low and simmer for 6–10 minutes until the sauce thickens slightly, stirring occasionally.
- Taste the chili and adjust seasoning with salt, pepper, or a pinch more chili powder if needed.
- Transfer the baked fries to an ovenproof serving dish if they’re on a separate sheet.
- Spoon the hot beef chili evenly over the fries.
- Sprinkle 1 1/2 cups shredded sharp cheddar evenly over the chili.
- Scatter 1/2 cup shredded mozzarella on top if you want extra stretch.
- Return the assembled dish to the oven and bake for 5–8 minutes until the cheese melts and bubbles.
- Optionally, place the dish under the broiler for 1–2 minutes to brown the cheese—watch closely to prevent burning.
- Remove from oven and finish with a grind of black pepper and optional toppings like chopped scallions, sour cream, and pickled jalapeños.
- Serve immediately while the cheese is hot and melty.
Pro Chef Tips
- Maximize fry crispness: Use a preheated baking sheet or place fries on a wire rack set over the baking sheet. This increases airflow and prevents steam from sogging the fries.
- Layer flavors in the chili: Bloom the tomato paste for a full minute before adding liquids to caramelize its sugars and deepen umami flavor.
- Control moisture: If your chili is very wet, simmer it uncovered longer to reduce moisture; too-wet chili will sog the fries under the cheese.
- Cheese strategy: Use sharp cheddar for flavor and a little mozzarella for stretch. Pre-shredded cheese contains anti-caking agents that can affect melt; freshly shredded yields a better melt and texture.
- Adjust heat: Add 1/4–1/2 tsp cayenne or a few dashes of hot sauce to the chili for more kick without overpowering other flavors.
- Make ahead: You can make the chili up to 3 days ahead and refrigerate. Reheat on the stove with a splash of broth before assembling.
- Even melting under broiler: Broil on low or use the top rack and keep the oven door slightly ajar to avoid overshooting a golden-brown finish.
- Salt at the end: Taste and adjust salt after reduction; flavors concentrate as the sauce thickens.
Variations & Substitutions
Make it vegetarian or vegan
- Swap ground beef for 1 lb textured vegetable protein (TVP) rehydrated in vegetable broth, or use crumbled tempeh or lentils for texture.
- Use vegan Worcestershire (or low-sodium soy sauce) and vegetable broth.
- Replace cheddar and mozzarella with plant-based shredded cheeses that melt well.
- Ensure fries are vegan — most frozen fries are, but check labels for added dairy.
Gluten-free option
- Most frozen fries and fresh potatoes are naturally gluten-free; confirm no cross-contamination on packaging.
- Use gluten-free Worcestershire sauce or substitute with tamari or coconut aminos.
Make it spicy
- Add 1 diced jalapeño to the onion when sautéing.
- Stir in chipotle powder or a couple teaspoons of adobo sauce for smoky heat.
- Top with pickled jalapeños and hot sauce at the table.
Cheese & topping ideas
- Monterey Jack + pepper jack for a melty, spicy combo.
- Crumbled queso fresco or cotija for a fresher, tangy finish.
- Sliced green onions, chopped cilantro, sour cream, and diced avocado add brightness.
Protein swaps
- Use ground turkey or chicken for a leaner chili; increase fat slightly with a drizzle of oil if dry.
Serving Suggestions
- Serve straight from the oven with napkins — this is a hands-on, shareable dish.
- Offer toppings in small bowls so guests can customize: scallions, sour cream, pickled jalapeños, diced tomatoes, hot sauce.
- Pair with a crisp green salad or coleslaw to cut richness.
- For game day, place the assembled dish on a warming tray to keep it melty.
- Serve with a cold beer, a bold soda, or an acidic wine like a zesty rosé.
Storage & Reheating Instructions
Leftovers will be saucy and slightly softer than freshly baked because the fries absorb moisture. Here’s how to store and reheat for the best results.
- Storage: Transfer cooled leftovers to an airtight container and refrigerate for up to 3 days.
- Freezing: You can freeze the chili (without fries or cheese) for up to 3 months in a freezer-safe container.
- Reheating (best): Preheat oven to 400°F (200°C). Spread leftover fries and chili on a baking sheet and bake 8–12 minutes until heated through. Add fresh cheese and broil 1–2 minutes to re-melt.
- Reheating (quick): Warm chili in a skillet with a splash of broth. Re-crisp fries on a baking sheet at 425°F for 6–8 minutes before assembling.
- Microwave: Microwave is fastest but will make fries soggy; only use if convenience matters more than texture.
FAQs (People Also Ask)
1. How do I keep fries crispy under chili and cheese?
To keep fries crispier, use a wire rack over a baking sheet so air circulates beneath the fries. Use a thicker, slightly reduced chili to minimize excess moisture, and add cheese only at the end just long enough to melt. Serving immediately also helps maintain texture.
2. Can I make Cheesy Chili Fries ahead of time?
Yes. Make the chili up to 3 days ahead and refrigerate. Reheat the chili on the stovetop, re-crisp the fries in the oven, then assemble and melt the cheese just before serving. Avoid assembling too far in advance to prevent sogginess.
3. What are the best cheeses for chili fries?
Sharp cheddar provides bold flavor; mozzarella adds stretch. For variety, try Monterey Jack, pepper jack (for heat), or a mix of cheddar and Colby. Freshly shredded cheese melts better than pre-shredded varieties.
4. Can I make a vegetarian version that still tastes hearty?
Absolutely. Replace ground beef with cooked lentils, crumbled tempeh, or rehydrated TVP. Sauté aromatic vegetables like mushrooms and bell peppers for added umami, and use a splash of soy sauce or miso to deepen flavor.
5. How long does it take to make baked Cheesy Chili Fries?
Active time is about 20–25 minutes to cook the chili and prep toppings. Oven time for fries and final melt is roughly 20–25 minutes. Total time is typically 40–50 minutes from start to finish depending on oven and whether fries are fresh or frozen.
Nutrition Information (Approximate)
Per serving (recipe yields 4 main-course servings):
- Calories: ~720 kcal
- Protein: ~34 g
- Fat: ~38 g
- Carbohydrates: ~58 g
- Fiber: ~5 g
- Sodium: ~1100 mg (varies widely based on broth and cheese)
Nutrition estimates are approximations and will vary with specific brands, portion sizes, and ingredient substitutions. For precise values, plug your exact ingredients into a nutrition calculator.
Prep & Cook Times, Servings
- Prep time: 10–15 minutes
- Cook time: 30–35 minutes (includes fries and chili simmering)
- Total time: 40–50 minutes
- Servings: 4 main-course servings or 6 as a shared appetizer
Final Notes
This Cheesy Chili Fries recipe has been vetted for texture balance, flavor layering, and practical home-kitchen execution. The instructions, tips, and variations reflect best practices used by professional chefs and experienced home cooks.
If you try this recipe, leave a comment with your favorite toppings or variations — your feedback helps others refine the dish and informs future improvements.
Try It & Share
Make this Cheesy Chili Fries recipe today and tag your photos if sharing on social media. If you enjoyed the dish, consider saving this page, leaving a rating, or exploring related recipes on the site for more comfort-food ideas.
Happy cooking — and enjoy the melty, crispy goodness!