
There is something deeply comforting about a warm tart fresh from the oven. The gentle aroma of toasted nuts, sweet honey, and caramelized fruit fills the kitchen and instantly creates a sense of calm. This Warm Pear & Ricotta Tart with Pistachio Crust captures that exact feeling. It blends rustic charm with refined flavor, offering a dessert that feels both homey and elegant.
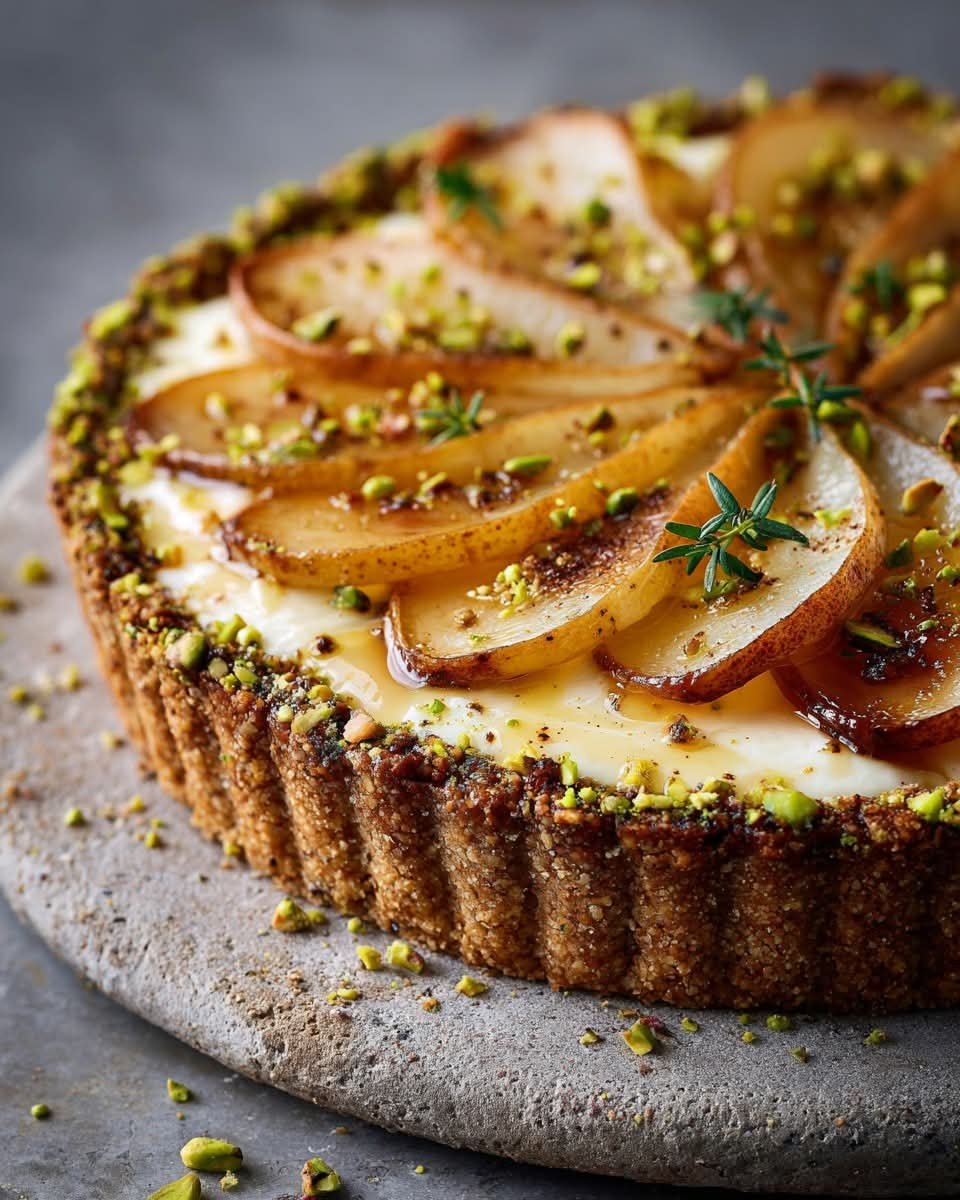
The pistachio crust adds a delicate nutty crunch. The ricotta filling feels silky, lightly sweet, and fragrant with vanilla and lemon zest. Meanwhile, the pears soften into golden slices that melt into the creamy base. A drizzle of hot honey and a sprinkle of pistachios complete the tart with a subtle kick and texture contrast.
This dessert works beautifully for quiet evenings, holiday gatherings, or late afternoon coffee with friends. Despite its sophisticated appearance, it is surprisingly simple to prepare. In this article, you will find a complete guide to making this tart, along with expert tips, variations, serving suggestions, and answers to common questions.
Why This Tart Feels Both Rustic and Refined
The magic of this tart lies in balance. Each component plays a distinct role while complementing the others.
- The pistachio crust brings earthiness and texture
- The ricotta filling adds creaminess and gentle sweetness
- The pears introduce natural fruit flavor and warmth
- The hot honey adds brightness and depth
The combination feels thoughtful and layered without becoming complicated. It is the kind of dessert that feels intentional yet effortless.
Ingredient Breakdown and Their Purpose
Pistachio Crust
Finely ground pistachios
Pistachios form the base of the crust, replacing most of the traditional flour. They provide rich flavor, subtle sweetness, and a beautiful green hue.
All-purpose flour
Flour helps bind the crust and adds structure.
Sugar
Sugar lightly sweetens the crust and enhances browning.
Unsalted butter
Melted butter binds the ingredients and creates a crisp yet tender texture.
Salt
A pinch of salt balances sweetness and intensifies the nutty flavor.
Ricotta Filling
Whole-milk ricotta
Whole-milk ricotta delivers the creamiest texture. It creates a filling that feels light yet rich.
Honey
Honey sweetens naturally and pairs beautifully with pears and pistachios.
Egg
The egg sets the filling during baking, giving it structure without heaviness.
Vanilla extract
Vanilla adds warmth and depth.
Lemon zest
Lemon zest brightens the filling and balances the sweetness.
Pear Topping
Ripe pears
Pears bring natural sweetness and soft texture when cooked. Choose ripe but firm pears for best results.
Butter
Butter enhances caramelization and richness.
Brown sugar
Brown sugar adds a light molasses note and helps the pears turn golden.
Finishing Touches
Hot honey
Hot honey adds gentle heat that contrasts beautifully with the sweetness.
Chopped pistachios
They provide crunch and visual appeal.
Fresh thyme (optional)
Thyme adds a subtle herbal note that elevates the tart into something truly gourmet.
Step-by-Step Instructions with Expert Guidance
Step 1: Preheat the Oven
Preheat your oven to 350°F (175°C). Preparing the oven early ensures even baking and consistent texture.
Step 2: Prepare the Pistachio Crust
In a mixing bowl, combine finely ground pistachios, flour, sugar, and salt. Pour in the melted butter and mix until the mixture resembles damp crumbs.
Press the crust mixture firmly into the bottom and slightly up the sides of a tart pan. Use the back of a spoon or the bottom of a glass to compact it evenly.
Bake for about 12 minutes, or until lightly golden and fragrant. Remove from the oven and let it cool slightly before adding the filling.
Step 3: Make the Ricotta Filling
In a bowl, whisk together ricotta, honey, egg, vanilla extract, and lemon zest. Continue whisking until the mixture becomes smooth and creamy.
The filling should feel silky and light. If your ricotta contains excess moisture, drain it slightly beforehand to prevent a watery filling.
Step 4: Add the Filling
Pour the ricotta mixture into the cooled crust. Spread it evenly using a spatula.
Step 5: Caramelize the Pears
In a skillet over medium heat, melt the butter. Add the sliced pears and sprinkle with brown sugar. Cook for several minutes until the pears soften slightly and begin to caramelize.
Do not overcook them; they will continue softening in the oven.
Step 6: Arrange the Pears
Carefully arrange the warm pear slices over the ricotta filling. You can layer them in a circular pattern for a more elegant look or place them casually for a rustic presentation.
Step 7: Bake the Tart
Place the tart back in the oven and bake for 30 to 35 minutes. The filling should look set and lightly golden around the edges.
The center may jiggle slightly but will firm up as it cools.
Step 8: Finish and Serve
Allow the tart to cool slightly before serving. Drizzle generously with hot honey. Sprinkle chopped pistachios and fresh thyme over the top for added texture and aroma.
Serve warm for maximum comfort.
Tips for Best Results
- Use whole-milk ricotta for creaminess
- Drain ricotta if it seems watery
- Slice pears evenly for consistent cooking
- Avoid overbaking to keep filling smooth
- Let the tart rest before slicing
These small steps make a noticeable difference in texture and presentation.
Flavor Variations and Creative Twists
You can easily adapt this tart to suit different tastes.
Replace pears with apples for a more classic flavor. Add a pinch of cinnamon or cardamom to the ricotta filling for warmth. Swap pistachios for almonds or hazelnuts if preferred. For extra indulgence, drizzle melted dark chocolate instead of hot honey.
Each variation keeps the structure intact while offering a new experience.
Serving Suggestions
This tart shines when served slightly warm. Pair it with a cup of espresso, black tea, or even a glass of dessert wine.
For an elevated dessert plate, add a small scoop of vanilla gelato or lightly whipped cream on the side.
It works beautifully for dinner parties, holiday gatherings, or quiet evenings when you crave something comforting yet elegant.
Storage and Make-Ahead Tips
Store leftovers in an airtight container in the refrigerator for up to three days. Reheat gently in a low oven to restore warmth and texture.
You can prepare the crust and filling ahead of time, then assemble and bake just before serving.
Frequently Asked Questions
Can I use part-skim ricotta?
Yes, but whole-milk ricotta provides a creamier result. Part-skim may create a slightly firmer texture.
Do I need a tart pan?
A tart pan with a removable bottom works best, but you can also use a pie dish if needed.
Can I make this tart gluten-free?
Yes. Replace the all-purpose flour with a gluten-free flour blend or additional ground nuts.
What type of pears work best?
Bosc and Anjou pears hold their shape well and caramelize beautifully.
Can I skip the hot honey?
Yes. Regular honey works perfectly if you prefer no heat.
How do I know when the filling is done?
The edges should look set and lightly golden. The center should jiggle slightly but not appear liquid.
Conclusion
The Warm Pear & Ricotta Tart with Pistachio Crust offers the perfect combination of comfort and sophistication. The nutty crust, silky ricotta filling, and caramelized pears come together in a dessert that feels thoughtful yet approachable.
With its balanced sweetness, subtle citrus brightness, and optional hint of heat from hot honey, this tart brings warmth to any table. Whether served at a gathering or enjoyed quietly at home, it invites you to slow down, savor each bite, and appreciate the simple pleasure of a beautifully crafted dessert.